Windows 10 System Restore can undo system changes and allow you to fix problems with the Operating System. This article will show you how to use system restore tool, and how to activate it.
Windows 10 System Restore comes pre-installed in the operating System, so there is no need to install anything. But, this program is not enabled by default, so you will need to switch this on manually. This is covered in more detail in the article below, along with the following topics.
- Enabling System Restore in Windows 10
- How to create a System Restore point in Windows 10
- How to perform a recovery using System Restore in Windows 10
The Windows 10 System Restore tool allows you to take a snapshot of the working windows system state and save this as a restore point. Windows will automatically create a new system restore when it detects significant OS changes. These would be installing new applications, Windows updates, and registry changes, for example. You can use this Windows tool to revert the system state to a previous working state before any modifications were made in the OS, allowing you to fix the problem.
Please note that System restore is not a backup, so you will still need to backup your data using a data backup application separately. It is always recommended to take a full complete backup of your data before making any system changes to your computer.
If you prefer check out the How to Video
Enabling System Restore in Windows 10
By default, System Restore is not enabled in Windows 10, requiring you to enable this manually.
- In the Windows 10 search window, search for (System Restore) as below, and hit Enter. The Systems Properties window will now open.
2. You need to now select the System Disk in the (Protection Settings) section as highlighted below.
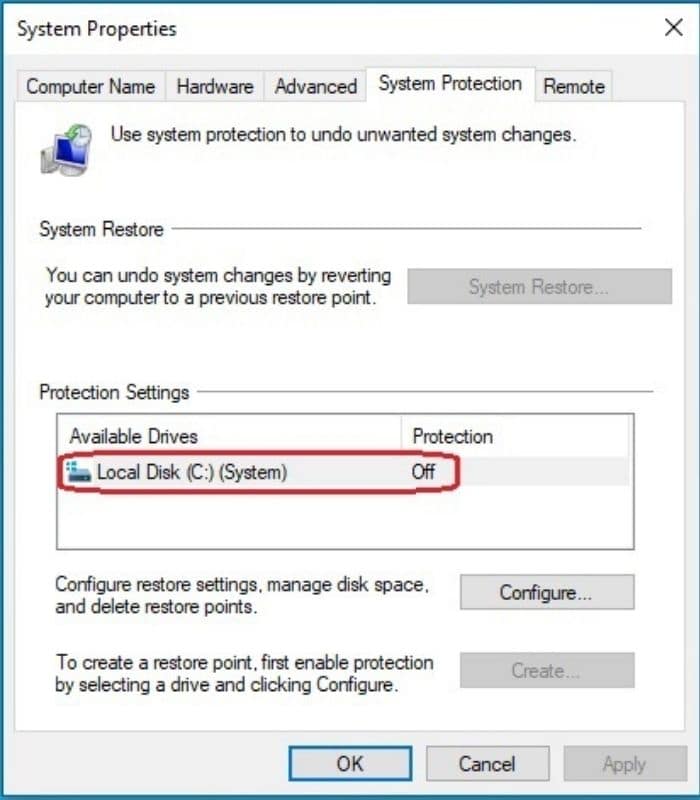
3. Now, Click on the Configure Button.
4. Select the check box (Turn on system protection)
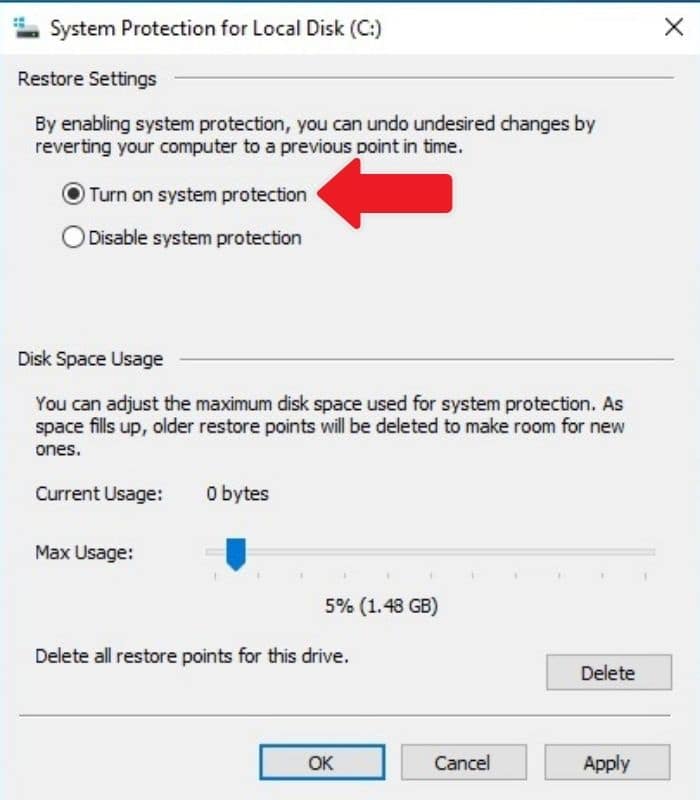
Note: You can now allocate the amount of Hard disk space that you want to assign Windows for the System Restore tool. This setting will depend on the size and the amount of Hard disk space on your Drive.
I have selected 5% of Hard Disk space on the screenshot, so you may want to follow this example or adjust it as required for your system. There is a Delete button that you can use to delete old System Restore points to free up space, but Windows will also manage this space for you automatically.
5. Now Click Apply
6. Click OK to confirm these settings
You have now configured System Restore for your System Drive. Windows will automatically create a restore point when new system updates are applied or specific system changes are made to your system.
The System Restore Tool cannot be able globally, so you will need to enable this on any other drives configured on your system.
Please note that System restore is not a backup, so you will still need to backup your data using a data backup application separately. It is always recommended to take a full complete backup of your data before making any system changes.
Creating a System Restore Point in Windows 10
Now that you have enabled System Restore, Windows will create a snapshot when Windows detects a System Change. This process is automatic, but you do have the option to create a system restore point manually. We recommend doing this if you are making system configurations like installing a new Application, Windows Updates, Registry Changes etc.
How to create a System Restore Point in Windows 10
1. In the Windows 10 search window, search for (System Restore) as below, and hit Enter. The Systems Properties window will now open.
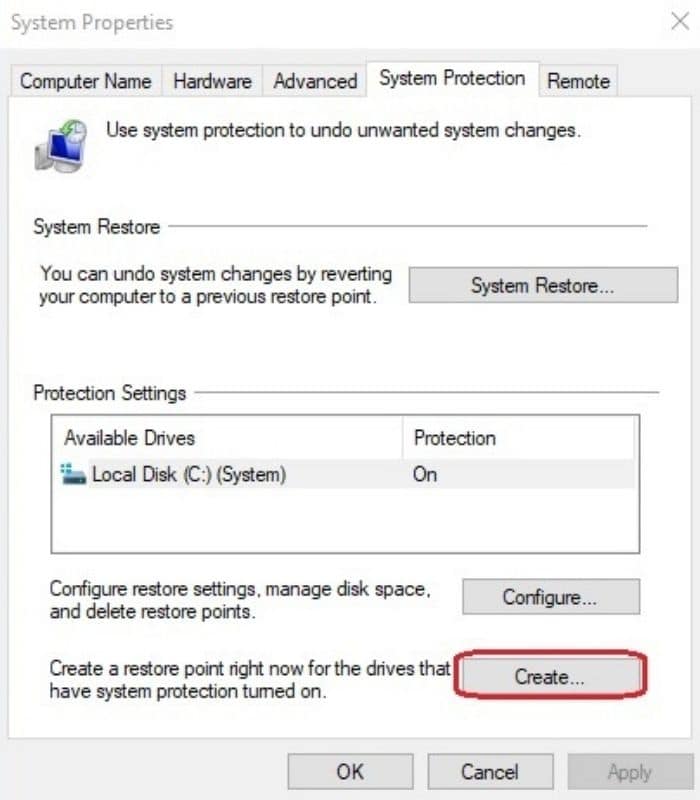
2. Now, you will need to click on the Create button at the bottom of the window as below.
3. You will now need to enter a name for the Restore Point. We recommend making this something that best describes what you are doing. In the example, we have described it as installing a new application.
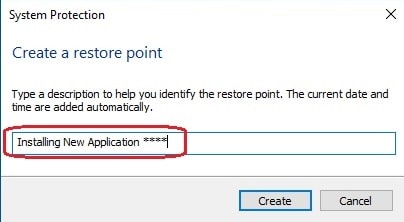
4. Now, Click Create
5. Once the Restore Point is created, you will see the box below, and then you can click Close.

6. Then, OK, to close the system properties Windows.
Congratulations, you have now created your first System Restore Point. You should be able to revert any system changes if you experience issues after installing a new Application, Windows Updates, Registry Changes etc.
How to revert and restore using a System Restore tool in Windows 10
1. In the Windows 10 search window, search for (System Restore) as below, and hit Enter. The Systems Properties window will now open.
2. Now, Click the System Restore Button as below.
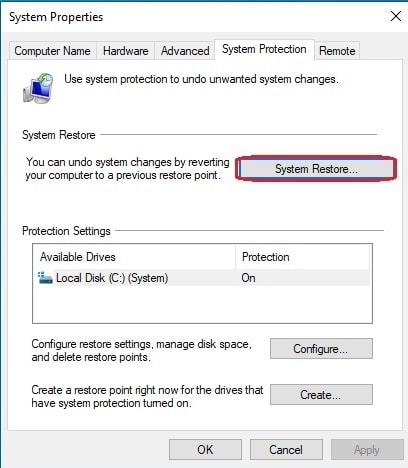
Note: There are no system restore points for the highlighted Drive if this button is greyed out.
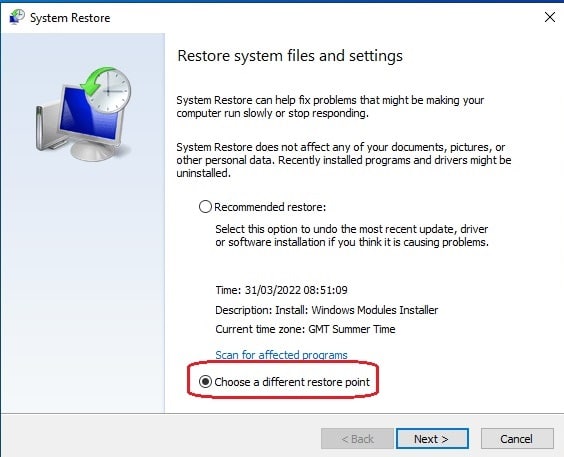
3. The System Restore Windows will open, and you will need to select Choose a different System Restore Point as below. This will enable you to view all the restore points for this Drive.
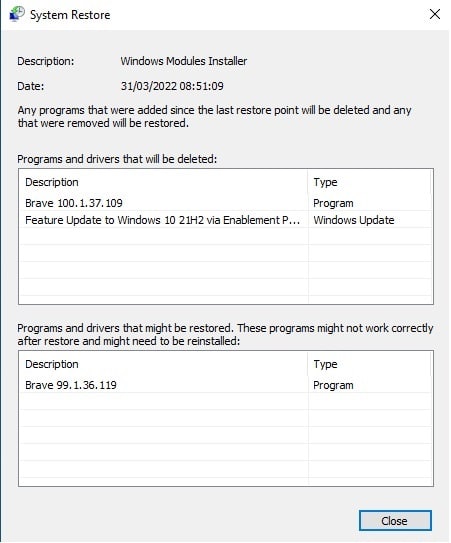
4. If you now click on the restore point that you want to view and click Scan for affected programs. You will now see the programs and drivers that will be deleted if you select this restore point. This is something to consider when deciding which restore point to use. Click Close when you have finished viewing this window.
5. Now highlight the System Restore point you want to restore and then click Next
6. And then click Finish
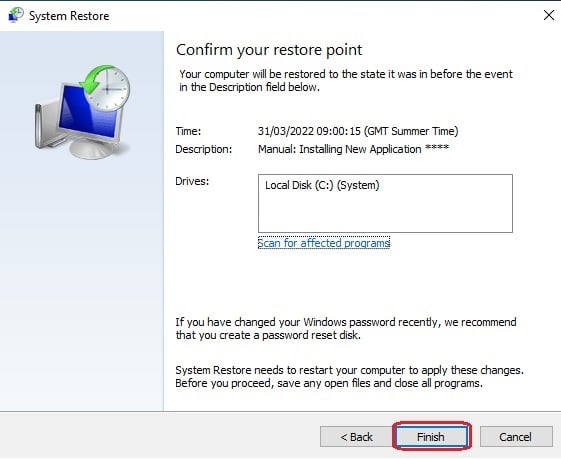
Once this step is complete, The System Restore Tool will apply this system restore and return the Windows state to the previous working condition. If Applications or Drivers were affected, these would need to be reinstalled once the recovery process is complete.
Conclusion
System Restore is a great tool to enable in windows, but this does not replace a full data backup. You must ensure that you use a separate software tool to backup your computer data. It is always best practise to take a full data backup of your computer before making any changes or installing any new applications.

